54 Livery Companies representing 111 crafts in 52 weeks! What could possibly go wrong?
(Narrator: It would all go very wrong, but in an interesting way...)
~ Scott
-------
-------
I've been to many renaissance faires and acted in quite a few, so I  don't walk around with a clipboard, taking note of the inaccuracies. That would be boring and boorish. Nonetheless, I think the one I find the most vexing for me (because it would be the easiest one to fix) has to be the Big Errol Flynn Pirate Belts I see walking around with people attached to them.
Belts in the 16th century just were not that wide. And the buckles are almost always all wrong to boot. I look at a lot of old artwork, delving into the sketchbooks of the artists when they're available, and nowhere do I see those big belts. And the metal-detector finds back me up on this one. The buckles we find just simply aren't that big. On average, buckles of the period seem made to fit a 1/2 - 3/4 inch strap.
I can't help noticing these things. It's a curse.
It's important to note that in this time period, belts weren't for holding your pants up. That's a relatively recent development, actually. Belts were there to hold your knife, sword, and/or purse and not much else. (The "I have everything I own tied to my belt" thing at renaissance faires also bugs the crap out of me, but I digress.) In the 16th century, your pants were tied either to the waistcoat or doublet with cords, called "points". In order to take your pants down, you had to take off your doublet or untie your points.
And before you ask: Yes, methods for disrobing and going to the bathroom are a common topic of conversation for male reenactors.

A properly-sized belt worn above a row of bows where the man's lower garments are joined to his upper garments.
Take a good look at Robert Dudley at the top of this post. He was Queen Elizabeth's favorite throughout most of his life. The very image of mid-reign manliness at the height of Elizabethan fashion. See his sword belt? It's maybe 3/4 inch wide at best. Probably less.
I only bring this up because it's a pet peeve (and you thought I only had pet cats) and because when we do these projects, it's important that we're replicating items as they actually were, not as Hollywood depicts them.
I only bring this up because it's a pet peeve (and you thought I only had pet cats) and because when we do these projects, it's important that we're replicating items as they actually were, not as Hollywood depicts them.
Of Buckles & Leather
The straps I use are generally 5/8 inch. Even this might be a bit wide. These original Tudor buckles from metal detector finds that are being made available for sale from UK website Crossman Crafts are affixed to 12 mm (1/2 inch) straps: http://www.crossmancrafts.co.uk/salvage/Yes those are real Tudor artifacts. Buckles are so abundant in the finds and so often made of base metals that they're rarely rated as "treasure" in the legal sense, so they can be and often are sold and exported. Aside from the obvious auction sites you can buy original pieces several places online. I like Crossman mostly because the site owner is a craftsman after my own heart and quite generous with his advice to other craftspeople. There's also Gaukler Medieval, which offers a small and ever-changing trove of original items, including artifacts of various periods: http://medievalwares.com/index.php?main_page=index&cPath=65&zenid=2mo9kdrnt8333hk2una5ghv6p1
Of course you can't ever really own a piece of history, but you sure can rent one for awhile.
Note that the real buckles don't look like most of the ones you see at the stores or in movies. The most prevalent in our period are what's known as a 'spectacle' buckle. Meaning they have two rings, and kinda look like a wee pair of glasses. They were made by casting in bronze and brass and/or various precious metals as suited the man or woman that ordered it.
At some point, we have to do some casting. The Goldsmiths, Pewterers and Founders companies lie ahead, of course, and that's what the soapstone in this picture is destined for. Casting projects will likely include buckles because they're an item that one always seems to need, as well as buttons and maybe some silly oddments like pilgrim's badges.
All that lies ahead of us, though, because the Girdler would have probably bought them or had them made special to his specifications by someone from one of those other specialties, then assembled them in his shop. If nothing else, the simple brass ones we're working with here wouldn't have been made much fuss over because they were for the more common folk such as your this humble craftsman whose hands you see here.

I think that I have a burr about belts because they're a very simple project. My first ever leather working project was a belt. I think I was ten. Even before that, my exposure to leatherworking was mostly my dad or grandpa punching extra holes in my belt to keep my jeans from slipping over my scrawny hips.
The Girdler's company did more than make average leather belts like these. They made fine girdles for ladies and sword belts for gentlemen. This sort of thing would be relegated to an apprentice, I should think. All the same, it's an important piece of kit.
For a simple, leather belt, there's only two pieces to worry about: A belt and a buckle.
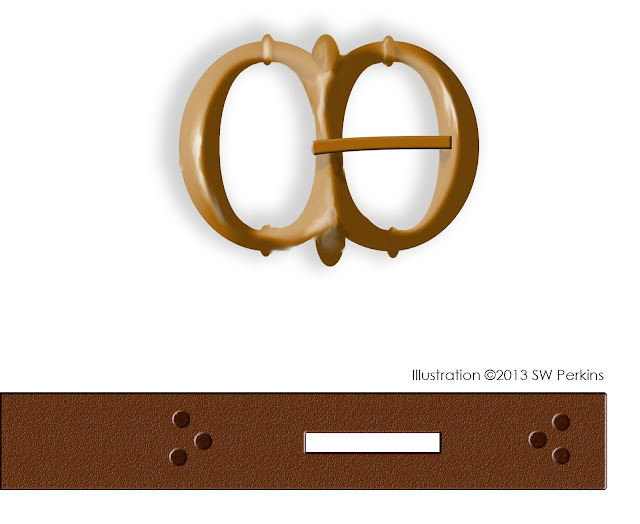
For a simple, leather belt, there's only two pieces to worry about: A belt and a buckle.

It goes like this:
- Order your buckle and cut an appropriately-sized strap (or buy one at a leather working supplier like I usually do. Unless you buy your leather wholesale, the savings of cutting your own straps just doesn't pan out like you'd think it should.)
- Cut a slot near one end of your strap to accommodate the tongue of the buckle.
- The buckle slips on, with the tongue passing through the slot and given enough room to travel by adjusting the length of your slot. You might have to fiddle with it a bit.
- Sew the buckle in place. I like sewing a little triangle as you can see, but there are plenty of other methods.
.jpg)
NOTE: Don't use pop rivets. They're convenient and I confess to having used them a lot before I learned better. Pop rivets are never really necessary and never look quite right. If you want rivets, go to your local hardware store and buy some proper ones and learn how to peen them properly.Honestly, sewing is much easier. Just punch the holes ahead of time and wax your thread like we did with the leather jack we made the other day.
Now, you might be saying "This article is incomplete" and you would be correct. The simple leather belt was the least of the Girdler's wares. Sword belts and fancy adornments for Milady's waist were the heights of their trade, but we're working on the lives of the commonfolk here at the School of the Renaissance Artisan.
Not that I wouldn't like to see input from some of the great craftspeople I know who specialize in those other areas.
Much like the pins we began this journey contemplating, what this simple leather belt gives us is a jumping off point for further explorations into the craft of those who cast the bronze and brass buckles, the craftspeople who tanned and sold the hides, and so on. This humble belt, assembled by a Girdler's apprentice, sits at the end of a long chain of suppliers, all of whom stand between us and the culmination of this project come December.
For the moment, though, revel in your perfectly period Elizabethan leather belt to gird you against a chaotic world.
~ Scott

.jpg)

.jpg)